In today’s environment, meetings have become an essential part of working. In most cases, they can take up as much as 50% of your work time, which can make employees feel unproductive or that it’s a poor use of their time. Some people do not realise that successful meetings are more than the actual meetings themselves. Aside from what we do during the meeting, what we do before and after can dictate how successful our meetings can be. Microsoft Teams provides a more comprehensive approach to managing those three phrases to help businesses streamline their meeting process. This article will talk about the three kinds of meetings we usually have and how Teams can effectively support your organisation before, during, and after your meeting.
Three Phases of Meetings
Pre-meeting
Before your meeting starts, ensure participants are prepared, getting everyone on the same page and in context. One best practice you can develop is sending the plan to your team to let them know what needs to be covered in the meeting. You can also send files or presentations you will be collaborating on beforehand. And if the meeting will take some time, you can even send a menu to get a list of what people want to order for lunch.
In-meeting
During the meeting, you would want to make sure that there’s a way to take notes and present. You may also be looking for the ability to share screens, collaborate on files, and record the meeting experience for future reference.
Post-meeting
After meeting with your team, one thing you want to be able to do is to have a plan to follow up on the information and action items you have discussed together. You will also want to make sure that there’s a way for your team to review notes or meeting minutes and watch the recorded videos to help guide them with what they need to do.
With Microsoft Teams, all this information is captured in one meeting area. Next, you will read how Teams can help you manage each piece of information and leverage it to its potential in three meeting setups – scheduled meetings, ad-hoc meetings, and channel meetings.
Scheduled Meetings
Scheduled or what we call stand-alone meetings are the ones we’ve set up in either the Teams or Outlook calendar.
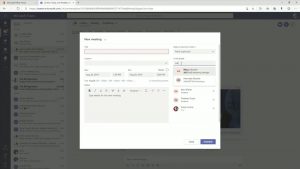
Setting up via Outlook and Teams
To schedule a meeting via Outlook, click the Join Teams Meeting icon. Aside from the link, you can use to join the meeting; you also get the conference bridge information. You can also add a distribution list or individuals you can set as optional or required to join the meeting. Another thing you can do is schedule a physical location for in-person meetings while still having a virtual space for those who might be joining remotely. Everyone who gets an invite will see it on their Outlook calendar and can join the meeting via Outlook. This is especially handy for external guests who don’t have Teams set up on their devices. Click here for a quick video tutorial: 5:16-7:38.
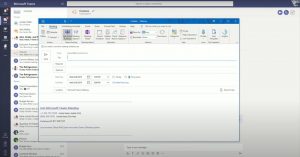
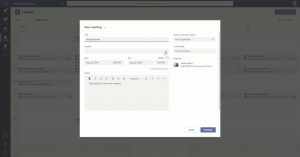
If set up via Teams, click the calendar icon on the left rail menu, and a wizard will appear where you can set the time, date and location of the meeting. You can also enable the repeat feature if the meeting will be recurring and invite people from both inside and outside your organisation. Teams also includes a scheduling assistant that shows you when the people in your network are available so you can choose a time and date convenient for all your participants. Once sent, all the participants will also get invites in their Outlook. Here’s a quick walkthrough of how it’s done: 7:39-13:34.
Organisers of Teams meetings can update and cancel appointments as needed. The meeting options button also allows you to specify who can access the meeting before it even starts because, by default, only members of the organisation can do that. You can also create a conversation with your participants to set the tone of the discussion by greeting or welcoming them or sending an agenda. To send files, you can drag and drop them from your local drive or choose one from OneDrive. Any updates done to the shared file will be saved and seen by all participants.
Joining a Conversation
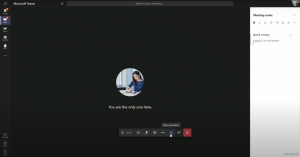
When you join a conversation, you will see a tray with various features such as turning on or off a webcam and mic, managing presentations, and sharing screens, files and apps. You also can record a video that will automatically be uploaded to the Microsoft Stream cloud. Another good thing about Teams is it sends a privacy statement to all participants once the recording starts. Taking notes and minutes is also something Teams has made easier for virtual meetings.
When you click the participants’ tab, an area will pop up on the right showing everyone invited to the meeting. It will also indicate which ones have already joined and haven’t logged in yet. As the organiser, you can remove and mute participants as needed. You can also chat with them while the presentation is ongoing. Click this link to see the setup: 13:46-21:10.
Post-meeting
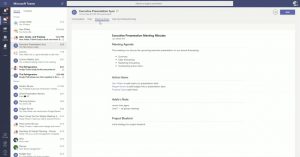
Once the meeting ends, it will redirect you back to the Teams chat staging area. There, you and your members will be able to access all the meeting recordings and files you’ve worked on together. This way, your team can rest assured that they can easily find the materials and resources. Follow this link to learn more: 21:11-22:57.
Ad-hoc meetings (from chat to call)
If you already have an existing group chat in Teams, all you have to do is click the calendar icon below the chat box to open the meeting wizard and schedule a session. The good thing about this is that you don’t have to add each team member manually, as they will automatically be pre-loaded in the meeting. If required, you can also add other people to the meeting without them getting added to the group itself. On the other hand, if what you need is a quick, real-time, unofficial meeting, you can just progress the chat to either an audio or video call. You still get the same functions, sans the meeting notes, that you get from a scheduled meeting.
Progressing from a one-on-one chat to a call is a little different. In this case, the recording option will be unavailable, but there are other apps you can use, such as OneNote, Word and Excel, to take notes. If there’s a need to record, you must schedule a meeting first. Click this link for a quick tutorial: 22:59-27:53.
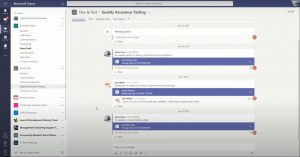
Channel Meetings
Consider Teams as a house that can be divided into various rooms called channels. Depending on the need, these channels can be project-based, group-based, or even location-based. You can even create a channel, especially for special events and announcements, where people can have fun and give kudos to each other. All recordings and files are shared in their channel or workstream to avoid cascading documents or information irrelevant to other groups. Another thing, channel meetings have to be scheduled via Teams and not Outlook.
Click the calendar icon on the left rail menu to schedule a meeting. There, you will get the option to choose which team and channel the meeting is located. A message will be left in the channel chat to alert everyone of the meeting. At the same time, you can also @mention the specific channel or team to notify your members so they can add it to their calendars. The team or channel members need to click the meeting banner in the chat and check “Add to Calendar” to invite themselves to the meeting. Here’s a walkthrough you can watch: 27:54-35:58.
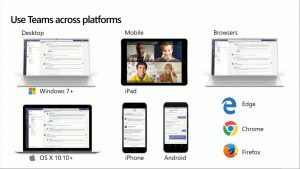
Device Compatibility
As the organiser, always make sure to carefully select and test audio and video devices ahead of time. And if you’re wondering how to figure out which devices you should use, you need to consider whether the meeting will be done closed-door, in a shared office or in a conference room. It is essential that you also know whether there are people who will join in the same room or remotely. Lastly, you have to check whether your chosen devices are compatible with Teams. To check compatibility, you can go to https://aka.ms/TeamsDevices to see the list of compatible devices with Teams. It wouldn’t be challenging to find a device that works with Teams since most that run on Windows, Mac, Apple and Android can be used. Various browsers such as Edge, Chrome and Firefox are also great options. Watch here to see how it’s done: 40:30-43:11.
Training Resources
Here are various links you can check out to learn more about Teams and start using them to grow your business:
– Live, online training: https://aka.ms/TeamsLiveTraining
– Self-guided how-to articles: https://support.office.com
– Quick how-to videos: https://aka.ms/TeamsTraining
Need help in getting started with Teams? Contact us and leave the rest to our team of professionals. With Qamba and Microsoft Teams, you can rest assured your meetings run effectively.

